Introduction to DSPy with Amazon Bedrock
Introduction
Earlier this week I had a chance to present this topic at a Silesia AI meetup and I figured it's a great opportunity to turn this topic into a blog post as well. So let's get started!
You probably noticed that LLMs and Gen AI is the hot topic for quite a while. However, I found that often, it's a bit challenging to design the data flow and manage the LLM calls within your application. That's where DSPy comes in!
For flexibility and access to multiple large language models, we're going to use Amazon Bedrock, which is supported out of the box by DSPy.
What is DSPy?
DSPy is a framework, written in Python, for "programming, rather than prompting" language models. The basic idea is that instead of writing potentially fragile promps, we can represent interactions with LLMs with code, which allows for easier composition, management, and testability.
Oh, I almost forgot, DSPy is easily installable with the following command, Python + pip required:
pip install dspy
Setting up our models
Before we dive deeper into capabilities of DSPy, let's setup our LLMs. For this exercise, we'll use Claude 3 Sonnet and LLaMa 3 70b, both available via Amazon Bedrock.
import dspy

bedrock = dspy.Bedrock(region_name='us-east-1')
lm_sonnet_3 = dspy.AWSAnthropic(bedrock, 'anthropic.claude-3-sonnet-20240229-v1:0')
lm_llama_3 = dspy.AWSMeta(bedrock, 'meta.llama3-70b-instruct-v1:0')
After having both of these models initialized, we can configure DSPy to use it with the following command:
dspy.settings.configure(lm=lm_llama_3)

or

dspy.settings.configure(lm=lm_sonnet_3)
DSPy Signatures
Now that we have our models ready, let's dive into the first building block of DSPy - Signatures. Signature is the basic building block of the DSPy, which allows to model inputs and outputs for LLM calls.
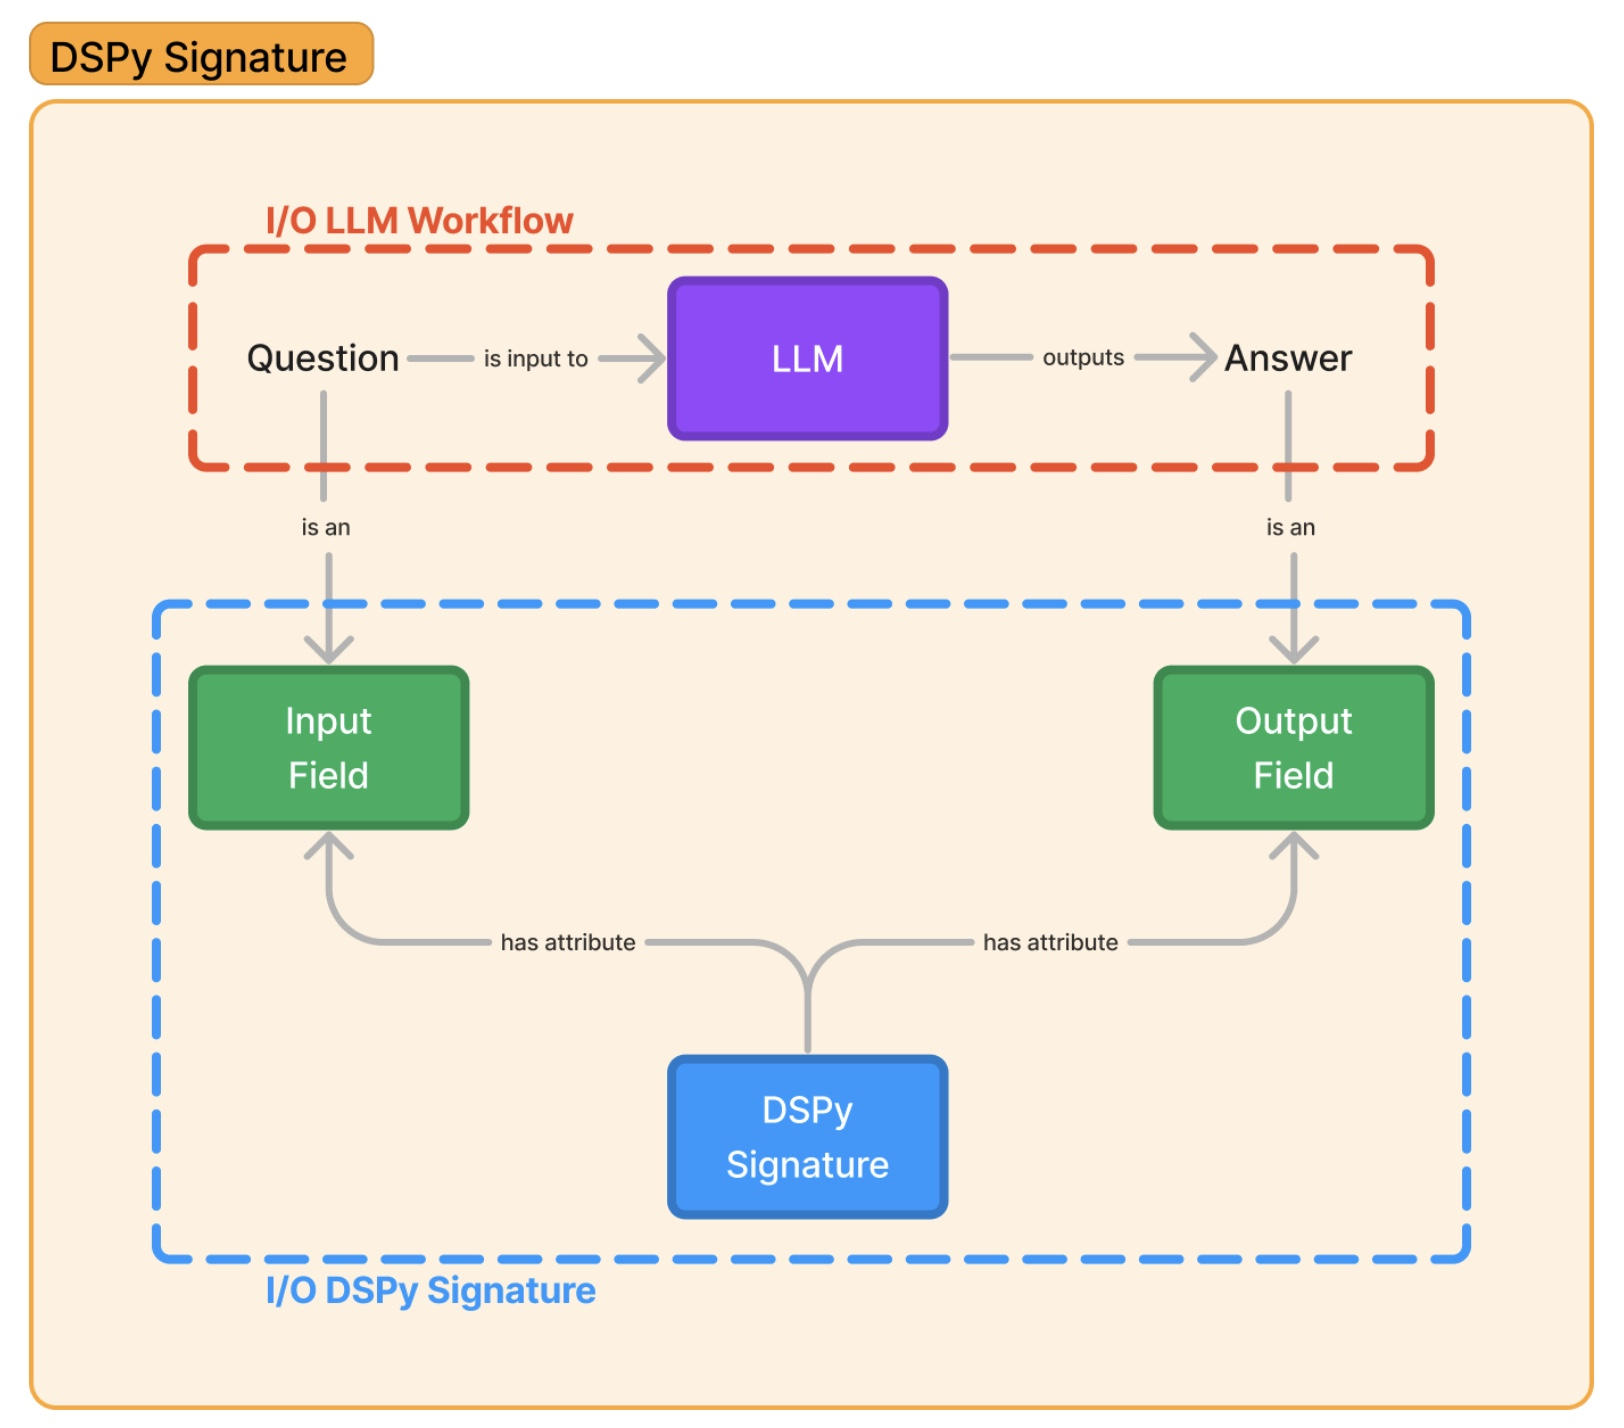
Let's write out first DSPy signature, for a very simple question -> answer flow.
class SimpleQuestion(dspy.Signature):
    """Answer questions."""
    question = dspy.InputField()
    answer = dspy.OutputField()
As can be seen above, defining signatures is pretty simple, with docstring defining the general behavior and attributes defining the inputs and outputs of the signature. We can use such a signature to now call a model of our choice.
predictor = dspy.Predict(SimpleQuestion)
res = predictor(question="When were you created?")
To invoke a model with our signature we're using dspy.Predict module on which we will focus on in the next section. In case of LLaMa 3, the answer was I was created in 2021. and was accessible via res.answer directly.
It's possible for signatures to have multiple inputs and/or outputs, we can extend our simple signature by an extra output field, justification:
class SimpleQuestionWithJustification(dspy.Signature):
    """Answer questions."""
    question = dspy.InputField()
    answer = dspy.OutputField()
    justification = dspy.OutputField()
Now, the res object will additionally include justification field, which can look like this:
Prediction(
    answer='I was created in 2021.',
    justification="I'm an AI, and my knowledge was cut off in 2021, so I don't have personal experiences or memories before that. I was trained on a massive dataset of text from the internet and can provide information on a wide range of topics, but I don't have a personal history or birthdate."
)
DSPy modules
Modules - another very important concept in DSPy. We already had a chance to use the simples one - dspy.Predict. Modules let us define a specific prompting technique within our application. Out of the box, we have access to the following modules:
dspy.Predict- simple prompt based on the signaturedspy.ChainOfThought- instructs the LLM to decompose the task into steps to be executeddspy.ReAct- interactive agent-like module, that uses a loop to think, act, and observe to solve a given taskdspy.ProgramOfThought- module that attempts to generate code that will be then executed to solve a given task
All of these models accept signatures with provided inputs to produce outputs. Combination of modules and signatures makes it very easy to define and compose various data flows within our LLM-based applications.
DSPy Optimizers
In addition to signatures and modules that make it easier to write LLM-based apps, DSPy also has a very interesting feature called optimizer. It allows to adjust internal prompts and weights of a DSPy program (single module or composition of modules) to produce better results. It requires a specific metric and training examples to run such optimizations. Below you can see an example optimization based on an embedded dataset, gsm8k, using one of the built-in optimizers called BootstrapFewShot.
from dspy.datasets.gsm8k import GSM8K, gsm8k_metric

gsm8k = GSM8K()
gsm8k_trainset, gsm8k_devset = gsm8k.train[:10], gsm8k.dev[:10]

dspy.settings.configure(lm=lm_llama_3)
mod = dspy.ChainOfThought("question -> answer")

from dspy.teleprompt import BootstrapFewShot

config = dict(max_bootstrapped_demos=3, max_labeled_demos=3)

optimizer = BootstrapFewShot(metric=gsm8k_metric, **config)
optimized_mod = optimizer.compile(mod, trainset=gsm8k_trainset)
After the optimization, we can evaluate the result using dspy.evaluate module
from dspy.evaluate import Evaluate

evaluate = Evaluate(devset=gsm8k_devset, metric=gsm8k_metric, num_threads=4, display_progress=True, display_table=0)

evaluate(optimized_mod)
Now, we can use the optimized module as any other module to perform LLM calls:
res = optimized_mod(question=gsm8k_devset[0].question)
with the example answer looking like this:
Prediction(
    rationale="Reasoning: Let's think step by step in order to calculate the combined distance all of the birds have traveled in the two seasons. First, we need to find out the total distance each bird traveled. In the first season, each bird traveled 50 miles. In the second season, each bird traveled 60 miles. So, each bird traveled a total distance of 50 + 60 = 110 miles. Since there are 20 birds, the combined distance all of the birds have traveled is 110 x 20 = 2200 miles.",
    answer='2200 miles'
)
Few extra things
Inspecting history for a given model
While experimening with DSPy, I found it really handy to be able to inspect the calls history of a given model. It's possible to do it via:
lm_llama_3.inspect_history(n=1)
It lets you see the exact LLM calls being made to underlying model, allowing you to see changes in the prompt, the overall process of the optimization, or just to see how many calls are being done for solving a particular task.
Simple syntax for signatures
While usually it's preferred to build signatures with dspy.Signature, it's also possible to define them with a simple string, e.g. question -> answer and use them with modules:
predictor = dspy.Predict('question -> answer')
res = predictor(question="When were you created?")
Summary
In this article we had a chance to quickly explore combined powers of DSPy and Amazon Bedrock, allowing us to build structured LLM-based applications, utilizing multiple models at the same time, and improve them thanks to optimizers. Hopefully it will help you building you existing application or inspire you to build something new on top of Amazon Bedrock and DSPy!